September 30, 2024
[The Basics of Interchangeable Lens Cameras] Explaining Exposure, Composition and Other Key Shooting Techniques
[The Basics of Interchangeable Lens Cameras] Explaining Exposure, Composition and Other Key Shooting Techniques
![[The Basics of Interchangeable Lens Cameras] Explaining Exposure, Composition and Other Key Shooting Techniques [The Basics of Interchangeable Lens Cameras] Explaining Exposure, Composition and Other Key Shooting Techniques](/global/consumer/article_file/file/article-how-to-take-good-photos_01.webp)
![[The Basics of Interchangeable Lens Cameras] Explaining Exposure, Composition and Other Key Shooting Techniques [The Basics of Interchangeable Lens Cameras] Explaining Exposure, Composition and Other Key Shooting Techniques](/global/consumer/article_file/file/article-how-to-take-good-photos_01.webp)
Some people might own an interchangeable lens camera but not yet be fully comfortable with the camera functions, different lenses and so on. To take photos well using an interchangeable lens camera, it’s important to have a good grasp of the basics, such as exposure and aperture. If you also pay attention to things like composition, angle, light and angle of view when shooting, you’ll be well on your way to taking photos like a pro. In this article, we will go over the basic knowledge you will need to keep in mind when taking photos with an interchangeable lens camera, and also share some shooting tips.
Exposure refers to the amount of light captured by the image sensor (image pick-up device) of an interchangeable lens camera. By adjusting the exposure, you can adjust brightness, expression and other qualities while taking photos. Even when shooting under the same environment, as your photos will turn out differently depending on the exposure settings you use, you need to make adjustments to ensure the proper exposure.
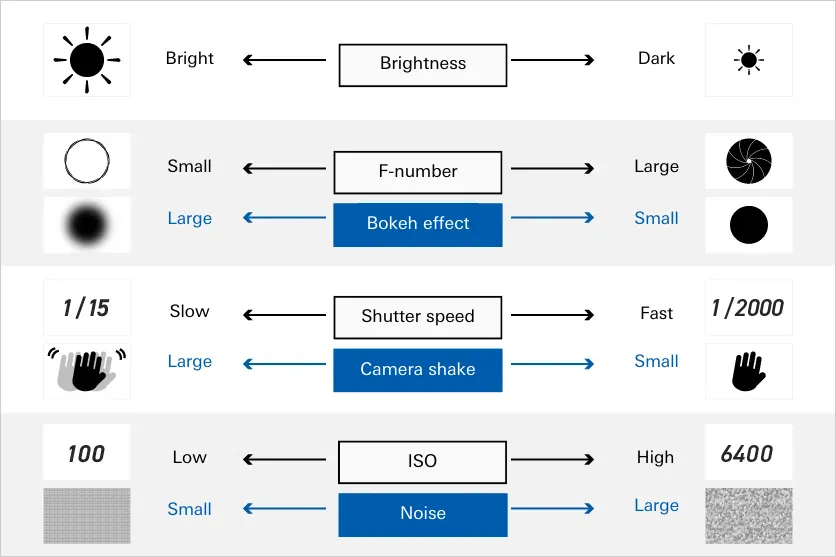
Exposure is determined by three elements, f-stop, ISO sensitivity and shutter speed. As these three elements form the basis of photography, let’s make sure we understand them.
What is f-stop (aperture)?
The f-stop, or aperture value, indicates the amount of light coming into a lens. The f-stop values are indicated as numbers such as F1.4, F2.8 or F4. The f-stop setting determines the size of the lens aperture (how open it is), and as this changes, so does the amount of light entering the lens.
For example, when a high f-stop value is set, the aperture of the lens is “stopped down” (narrowed), and less light passes through the lens. The system also works in reverse: when a smaller f-stop value is set, the aperture of the lens is “opened up” (widened), increasing the amount of light entering the lens. The f-stop of a lens that corresponds to its maximum possible aperture is referred to as the “maximum” or “wide-open” aperture.
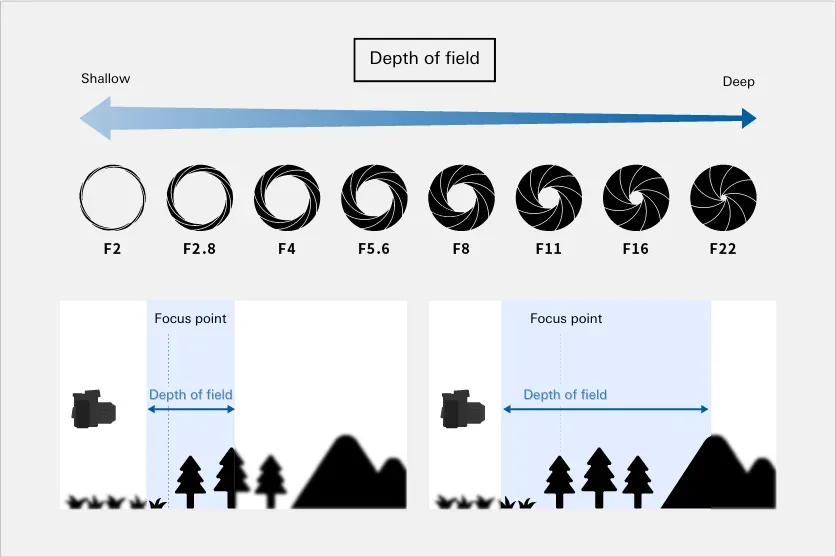
F-stop also affects bokeh. When a small f-stop value is set, the depth of field (the range over when items in a photo are in focus) becomes shallower, making bokeh more prominent. Conversely when the f-stop value is increased (when the aperture is stopped down), the depth of field increases, and bokeh becomes less noticeable. As a lens captures more light the greater its wide-open aperture (the smaller the f-stop value), a large aperture lens offers various benefits, such as allowing you to increase the shutter speed and keep the ISO sensitivity lower. This makes it an important factor to consider when choosing a lens.
F-stop values are stated as part of the name of a lens.
For example, a lens name of “35-150mm F/2-2.8 Di III VXD” indicates f-stop values of “F/2-2.8.” This shows that the wide-open aperture (at the wide end of the lens) is F/2.
When choosing a lens, always check its wide-open aperture.
What is ISO sensitivity?
ISO sensitivity indicates how sensitive the image sensor equipped in an interchangeable lens camera is to the light it receives. ISO sensitivity can be set to various numbers such as 100, 400, 1600 and 6400. When this ISO sensitivity setting is set high, the signal is amplified and a brighter exposure can be obtained. This allows you to shoot with an exposure that is not too dark even when shooting in dim locations.
However, if you raise ISO sensitivity by too much, the amount of noise increases and colors can end up blown out, so when it is possible to ensure a sufficient amount of light, it is best to select a lower ISO sensitivity.
What is shutter speed?
Shutter speed indicates the time during which the shutter is open. The shutter speed can be set to specific numbers that are fractions of a second, such as 1/100 sec., 1/250 sec. or 1/1000 sec.
When the shutter speed value is high (meaning the shutter opens for a short time), the amount of light decreases, resulting in reduced motion blurring and making it easier to capture a moment in time. On the other hand, if the shutter speed is slow (meaning the shutter opens for a long time), the amount of light captured by the lens increases, but it is easier for motion blurring to occur.
For example, when you are shooting sports scenes or pets that are moving around, it is best to set a fast shutter speed to match the fast movements of the subject, which helps you take good looking photos.
Utilize your camera’s exposure modes
When you first get started with an interchangeable lens camera, you will probably have trouble setting the proper exposure. That’s why we recommend utilizing exposure modes. Interchangeable lens cameras are equipped with functions to automatically control exposure. You can easily set exposure by choosing “aperture priority,” “shutter priority” or “program” mode.
Aperture priority mode
With aperture priority mode, you can set your desired f-stop value and the camera will automatically adjust the shutter speed. This comes in handy when taking photos utilizing bokeh.
Shutter priority mode
With shutter priority mode, you can set your desired shutter speed and the camera will automatically adjust the f-stop. This mode makes it easy to take photos when you want to shoot moving subjects and suppress camera shake, such as sports photography.
Program auto
Program auto is a mode that automatically controls both f-stop and shutter speed. As this allows you to minimize failures when shooting, many people start out using this mode. However, as this makes it difficult to take photos that reflect your own expression, ones you are accustomed to it, we recommend trying out the other modes.
Manual mode
In manual mode, you can set the f-stop and shutter speed manually. As this allows you to produce the nuances you envision, you should try out manual mode once you have become more accustomed to photography.
Use exposure compensation to adjust brightness
If you use one of the exposure modes available on your camera body, the camera automatically sets the exposure for you. However, that doesn’t mean the camera will always produce the level of brightness you desire. At those times, you should make use of the exposure compensation function provided by your interchangeable lens camera body.
Using this function, you can change the proper exposure determined by the camera to the number you desire. When you want your photo to have a brighter look, select an exposure compensation on the “+” side, and choose the “-” side when you want to darken it.
Control bokeh by setting the aperture
Many people want to take photos that utilize bokeh and look typical of what is possible with an interchangeable lens camera. F-stop (aperture value) settings are important for blurring the background of an image. When you want to create more bokeh, you open up the aperture by setting a low f-stop value. Conversely, when you want to reduce the amount of bokeh, the point is to stop down the aperture by setting a higher f-stop value.
Getting creative with composition is an important part of photography!
When shooting with an interchangeable lens camera, you may be worried about always producing the same kinds of photos or utilizing bland compositions. Composition plays an important role in expressing the sensibilities and balance of a photograph. As you can significantly affect the mood of a photograph just by making small changes to composition, we recommend experimenting with it in various ways. Here we will introduce several approaches to composition that are common in photography.
Look for leading lines
When thinking about the composition of a photo, it is a good idea to pay attention to leading lines. A leading line is a line that guides the gaze of the viewer. There are various kinds of leading lines, such as horizontal, vertical, diagonal and curved lines.
These leading lines are essential elements in the composition of a photograph. By incorporating them into your composition, you can unconsciously lead the attention of a viewer over to your subject, helping them to stand out. Try to balance your composition with the smart use of leading lines to lend greater creativity and variety to your images.
Basic photography composition (1) Rule of thirds
The rule of thirds is an approach to composition that divides the image into thirds, both horizontally and vertically. Place the main subject at one of the places in the 3x3 grid where lines intersect. And advantage of photos composed according to the rule of thirds is that they ensure appropriate margins along all four sides of the image, improving overall balance.
If each intersection is also stressed, it can make it easier for leading lines to guide the viewer’s gaze to the main subject. As this is a versatile composition that can easily be employed for any photo, it’s a good one to learn.
Basic photography composition (2) Diagonal composition
Diagonal composition places the main subject along a diagonal line. The subject doesn’t need to be arranged diagonally from one of the corners of the image. You can produce a diagonal composition by placing diagonal lines in your photo. As the use of this composition products diagonal leading lines, it can produce a sense of dynamism. This composition is easy to use when you want to give your photo depth or a sense of rhythm.
Basic photography composition (3) Triangular composition
With a triangular composition, the subject is placed at the apex of or around the sides of a triangle. The use of this composition makes it easier to achieve a sense of balance or depth in your photo because the longer side is at the bottom.
For example, if you pay attention to triangular composition when photographing landscapes with mountains, buildings and so on, it will be easier to express a sense of solidity. You can also produce dynamic expressions with this composition by photographing a building looking up from below.
Try incorporating other compositions
In addition to the rule of thirds and diagonal composition, there are many other compositions that can make your photos more appealing. Some other compositions are listed below.
Tunnel composition
With the tunnel composition, the subject is placed in the center, and another subject is placed around it. Using this composition, you can create the impression of looking through a tunnel at the subject.
Rule of fourths
The rule of fourths is an approach to composition that divides the image into fourths both horizontally and vertically, and places the subject at an intersection of the lines. You can use this composition to make greater use of space in an image. Try using this composition when the subject is too close to the center in a rule of thirds composition, or when it is hard to achieve a good balance when the density of the landscape is too little relative to the angle of view.
Hinomaru (Japanese flag) composition
Hinomaru composition places the subject in the dead center of the image, mimicking the composition of the Japanese flag. This is ideal when you want to direct the viewer’s gaze to the center of the image. As the subject stands out strongly in the center, it is important to use a simple background or utilize strong bokeh effects.
Try changing your angle or position
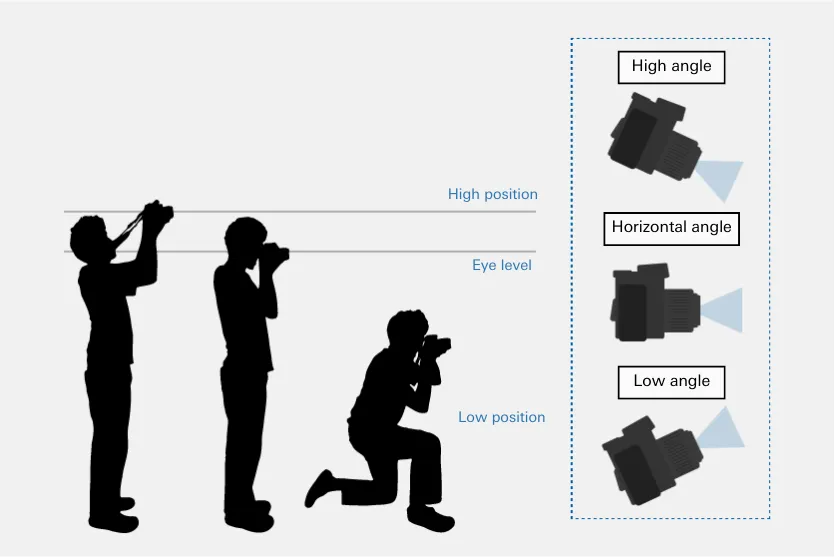
It’s a good practice to pay attention to your angle and position when shooting with an interchangeable lens camera. Angle refers to the angle the camera is pointing. There are various angles, such as low angle, high angle and level angle.
Position refers to the position from which the camera is held. These also vary, such as low position, high position and eye level.
Even when photographing the same subject, you can dramatically change the impression a photo gives and how the background looks just by adjusting the angle or position. Always keep angle and position in mind, as they significantly impact the impression of a photograph, including the relationship to the subject.
Shooting from a low position at a high angle
When photographing children, pets and similar subjects, try shooting the subject from a low position with a high angle. If you tilt the camera upward from a low position, you can give a dynamic look to shorter subjects. As this also allows you to shoot at the eye level of the subject, you can give your photos a more realistic feel.
Shooting from a high position at a low angle
If you tilt your camera downward from a high position, it is easier to express the vastness or openness of a space. For example, when photographing flowers or a city scape, paying attention to a high position, low angle composition allows you to take a high density photograph, or one with a sense of depth.
Get creative with the direction of light to produce a dramatic mood
Getting creative with the direction of light is a good way to take compelling photos. The direction of light takes various forms, such as direct light, back light, side light, slanting light and semi-back light. If you pay attention to these types of light directions, the look of your photos will change drastically, making it easier to produce dramatic qualities that will give your photos a sense of narrative.
When you want to render clear images, go for direct light
Direct light is when the light hits your subject straight on. Since the subject is completely lit up from the front, they are rendered in distinct detail, and their facial expression, shape and other information can be clearly expressed. Direct light also makes it easier to produce vibrant color and is ideal for when you want to give a colorful impression.
Use back light to produce emotional moods
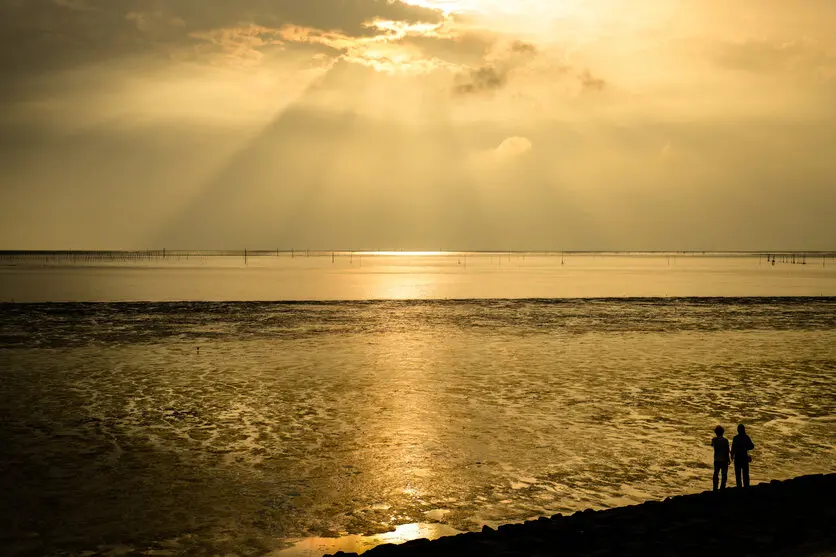
Back light is when the light hits your subject from behind. When you shoot in back-lit conditions, you can create an emotional or nostalgic mood. When you want to take photos with an atmospheric feel, we recommend experimenting with back-lit shots.
Side light emphasizing shadows on the subject
As the words suggest, side light refers to when light hits the subject from the side. As side light can produce clearly defined shadows depending on the unevenness of the subject, it is known for emphasizing three-dimensional effects. Side light can be used as an accent when you want to create a cool look or dramatic expression.
Shoot with the right lens for the task!
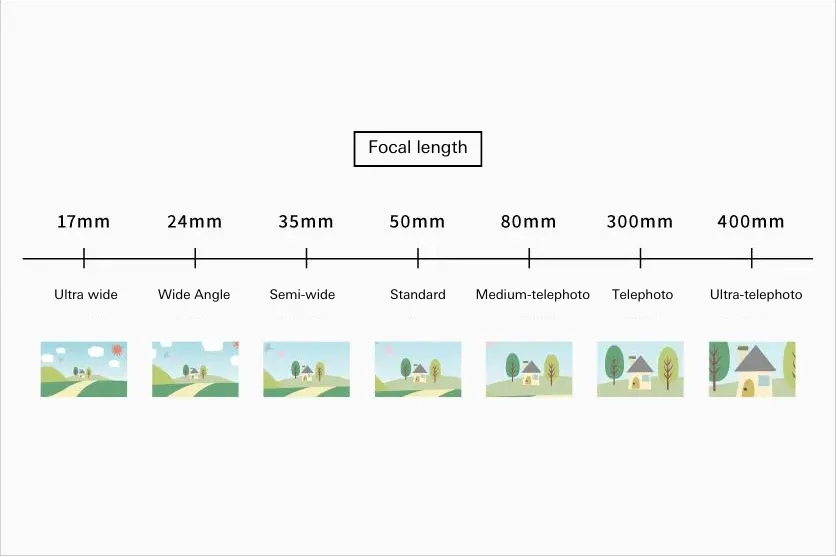
There is an extensive range of lenses for interchangeable lens cameras. From prime and wide-angle to standard and telephoto, a wide range of lenses are available and you can swap lenses to suit the scene you are shooting. If you gain a good understanding of the characteristics of each lens and use different lenses to get the results you desire, you will have an easier time getting your subjects to stand out and producing compelling photos.
Prime lenses make it easier to produce bokeh
A prime lens is a lens whose focal length is fixed. As prime lenses generally have large wide-open apertures (low f-stop values), one of their advantages is the ability to produce photos with a strong sense of bokeh. Prime lenses also typically have strong resolving power, making them suited to taking photos with high image quality.
However, since a prime lens has only one focal length, you cannot change the angle of view by manipulating the lens as you can with a zoom lens. When a photographer wants to change the angle of view, they must instead adjust their distance from the subject by moving themselves.
Wide-angle lenses for shooting dynamic landscapes
A wide-angle lens is a lens with a wide angle of view and a large depth of field. A wide-angle lens has the advantage of allowing you to capture a wide area with a deep range over which elements in the scene are in focus. As a wide-angle lens also makes distant objects appear even farther away and smaller, it has the effect of emphasizing perspective.
This type of lens is often chosen when photographers want to capture scenery dynamically and with crisp detail, such as with natural landscape photography.
Standard lens as the ideal option for portraits and snapshots
A standard lens is one whose angle of view resembles the field of view in human vision. A standard lens is suited to photos that are realistic or have a natural sense of distance from the subject, such as portraits, snapshots and table-top photos.
Telephoto lens for shooting subjects from faraway locations
A telephoto lens is a lens with a narrow angle of view that lets you enlarge distant subjects when capturing them. As telephoto lens allow you to photograph things from faraway locations, they are often used to shoot subjects such as sporting events, school sports days, concerts and wildlife.
Telephoto lenses are also known for their shallow depth of field which makes it easier to produce bokeh, and for the compression effect that makes distant objects appear closer together. These lenses are often used for portrait photography, as it makes use of these characteristics.
Incorporate accessories when taking photos
A wide range of accessories are available for interchangeable lens cameras, including tripods, filters and flashes. Making use of these accessories to suit the situation can also broaden your photographic expression. Here is a look at some recommended accessories.
Tripod
A tripod is a three-legged stand used to support a camera. When you attach an interchangeable lens camera to a tripod, the camera will be stabilized, allowing you to take photos with minimal camera shake. As camera shake can be particularly pronounced when using a telephoto lens, a tripod can be an essential accessory for this type of lens.
Filter
Filters are circular accessories attached to the front of a lens. An ND filter, for example, has the effect of reducing the amount of light entering the lens, and is used to produce special effects with long exposures, among other applications. Meanwhile a PL filter cuts polarized light, enabling it to suppress reflections from the surface of water or glass. It is also used to take clearer and more vivid pictures of blue skies.
Flash
A flash is a kind of light for a camera. Flashes are also referred to as strobes, and come in different types such as build-in flashes and external flashes. The use of a flash allows you to take bright photos even in indoor or dim locations with minimal light.
TAMRON Lens Utility™
If you own a TAMRON lens, we recommend using the TAMRON Lens Utility. You can use this software to easily customize your TAMRON lens, update its firmware, and more. We highly recommend making use of this utility, as it offers a range of handy features for shooting video, including Focus Preset, A-B Focus and AF/MF Toggle.
Key Photography Tips for Each Shooting Situation
In this section we offer some key points on how to photograph different scenes.
1. Shooting portraits
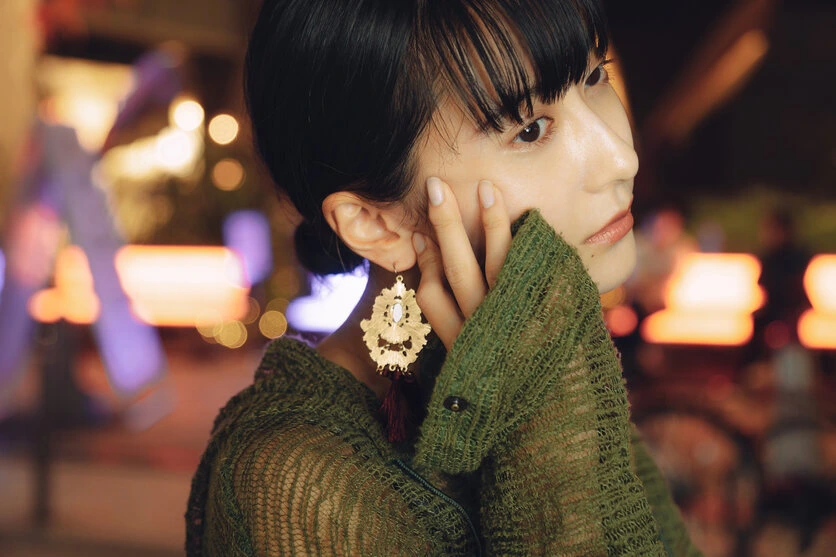
Key points with portrait photography are to open up the aperture of your lens, use a telephoto lens, and blur the background. By reducing the amount of information in the background, you can allow your subject to better stand out.
2. Shooting sports photography
A telephoto lens shines with photographing sporting events, school sports days and similar occasions. To ensure you don’t miss any shots, increase your shutter speed, allowing you to freeze the action to capture individual moments. We also recommend using a vibration compensation, and if possible, a tripod can also help to reduce camera shake.
3. Photographing children and pets
When photographing children or pets, a key point is to shoot at the same eye level. When an adult holds a camera from their eye level, it can produce a composition with a view looking down from above, which tends to capture a lot of the ground or floor in the photo. By aligning with the eye level of a child or pet, you can capture adorable moments from various directions.
4. Shooting natural landscapes
A key point when photographing natural landscapes is to give variety to the composition. If you employ the rule of thirds or rule of fourths in your composition, it will be easier to take photos that balance the strength of different elements. To avoid taking flat-looking images, experiment with various angles and utilize the perspective effects of a wide-angle lens.
When shooting night views, it’s important to use a lens with as large an aperture as possible (as small an f-stop value as possible). Using a bright lens will allow you to take clear photos even at night. In addition, as you often need to use slower shutter speeds, we recommend using a tripod to suppress camera shake, and getting creative with the composition so that you image doesn’t appear bland.
Rays of light entering your photo can instantly create a magical image. When you want to incorporate rays of light the use of a wide-angle lens is recommended.
Great for beginners and experienced photographers alike! Introducing TAMRON’s lens lineup
For beginners, a lightweight, compact and portable zoom lens that covers a wide range of view angles offers ease of use. Many of TAMRON’s lenses offer those features combined with high image quality, autofocus (AF) and vibration compensation. We recommend these lenses not just for your first lens, but also if you are considering a second lens.
Grasp basic photography knowledge and take your photography to the next level!
To take compelling photos with an interchangeable lens camera, you need to be comfortable with the basics such as exposure, aperture and shutter speed. Composition is another important aspect to photography. Start by trying to master basic composition. Incorporating accessories such as tripods, filters and flashes can also improve the quality of your photos. We also recommend utilizing handy items such as the TAMRON Lens Utility.

Lens Featured in this Impression
-

-
28-200mm F/2.8-5.6 Di III RXD a071(Model )
Tamron has distilled all the technical capabilities and know-how amassed over the last 28 years in its development of all-in-one zoom lenses into the creation of this 28-200mm F/2.8-5.6 Di III RXD (Model A071), designed exclusively. The lens has a large maximum aperture of F2.8 at 28mm wide end, which represents a world’s first* for all-in-one zoom lenses, and delivers high-level performance across the entire zoom range, from the 28mm wide-angle end to 200mm telephoto.
-
-
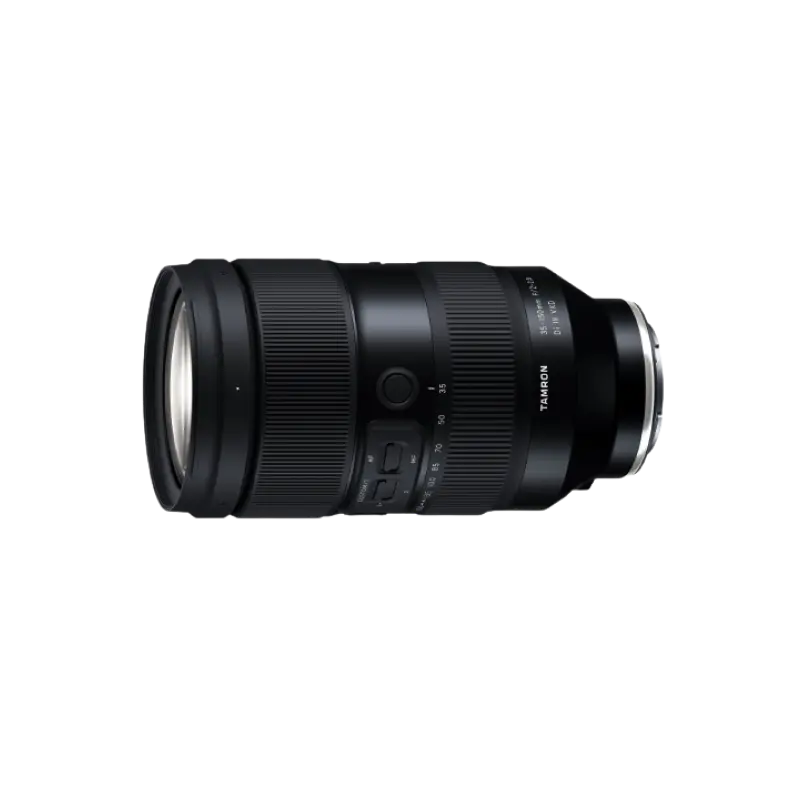
35-150mm F/2-2.8 Di III VXD a058(Model )
The 35-150mm F/2-2.8 Di III VXD (Model A058) is a high resolution travel zoom lens that covers everything from the 35mm wide angle to the 150mm telephoto focal length, the first zoom lens achieving an aperture of F2 at the wide angle end. It has a groundbreaking fast-aperture and utilizes the linear motor focus mechanism VXD (Voice-coil eXtreme-torque Drive), thereby achieving high speed, high precision autofocusing. The innovative lens design enabled us to greatly improve the lens's grip and functionality. The software, developed in-house, enables to easily customize functions and to update firmware.
-

-
70-300mm F/4.5-6.3 Di III RXD a047(Model )
The 70-300mm F/4.5-6.3 Di III RXD (Model A047) for full-frame mirrorless cameras is a telephoto zoom lens designed and created so photographers of all skill levels can enjoy high quality images comfortably. The 70-300mm F4.5-6.3 covers a broad telephoto zoom range yet is the small and lightest weight. With special emphasis on resolving power, TAMRON has deployed special lens elements appropriately arranged to correct chromatic aberration, generally very strong in a telephoto lens, as well as other aberrations. Users can enjoy high-resolution images combined with stunning bokeh qualities that are achievable only with a telephoto lens. The lens also incorporates the RXD, a high-speed precision AF drive system that is remarkably quiet. The 70-300mm F4.5-6.3 is a versatile lens for photographing landscapes, sports and other action, pets, wildlife, and more. The lens also demonstrates its potential for portrait shooting, casual snapshots, and scenarios that require you to be mobile and shoot handheld, like sporting events.
-

-
28-75mm F/2.8 Di III VXD G2 a063(Model )
Product Page | 28-75mm F/2.8 Di III VXD G2 (Model A063) is the second-generation fast-aperture standard zoom lens for Sony and Nikon full-frame mirrorless cameras, offering significantly improved optical and autofocus performance and new function customization.
-
-
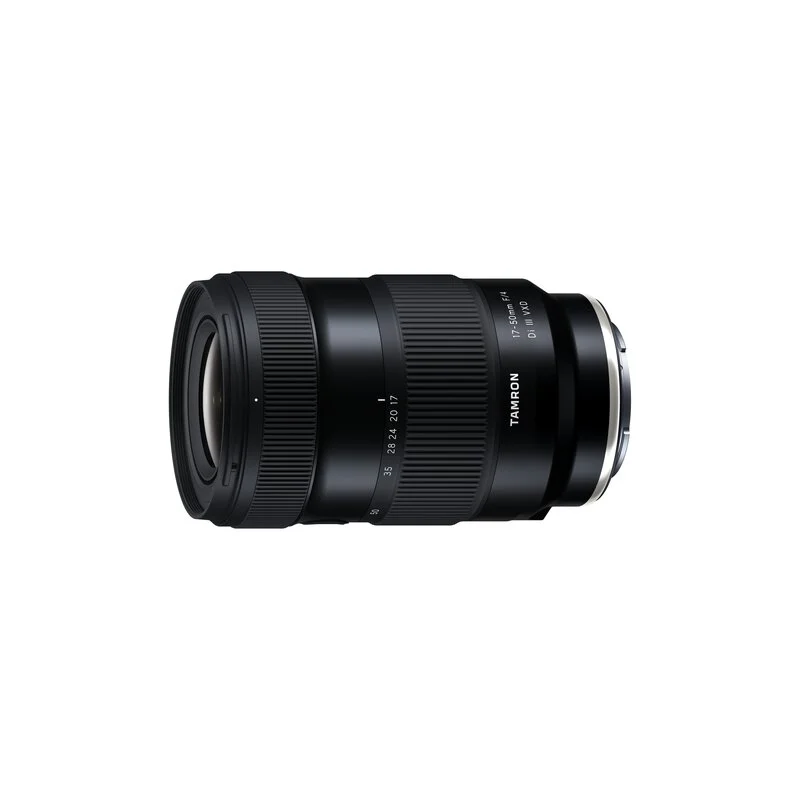
17-50mm F/4 Di III VXD a068(Model )
It's the world’s first lens covering from ultra wide-angle 17mm to the standard 50mm focal length. The highly-compact TAMRON 17-50mm F/4 Di III VXD (Model A068) for Sony E-mount full-frame mirrorless cameras offers maximum versatility for still and video creators. From landscapes to living rooms, this lens captures all that you see.

