March 25, 2025
[How to take landscape photos] Make the most of the composition to create a dynamic shot! Tips for taking well-balanced photos
[How to take landscape photos] Make the most of the composition to create a dynamic shot! Tips for taking well-balanced photos
![[How to take landscape photos] Make the most of the composition to create a dynamic shot! Tips for taking well-balanced photos](/global/consumer/article_file/file/article-%20how-to-shoot-landscape/01.webp "[How to take landscape photos] Make the most of the composition to create a dynamic shot! Tips for taking well-balanced photos")
Majestic mountains, expansive oceans, beautiful sunsets... When we encounter landscapes that move us emotionally, we want to capture them in photographs. But when you press the shutter, have you ever felt that the photo doesn't adequately express the emotion of the actual scenery? In fact, there are a few tips for taking impressive landscape photos. In this article, we will introduce some landscape photography techniques that even beginners can put into practice.
Landscape photography should be focused on realism and dynamism
To capture the beauty of a magnificent landscape in a photograph, it is important to take pictures with an awareness of depth and a three-dimensional composition, rather than simply cutting out the scenery. For example, placing subjects such as rocks, trees, and flowers in the foreground and creating a relationship with the distant scenery will create a sense of realism that makes you feel as if you are actually there. You can also give a dynamic impression to a photograph by using creative angles to emphasize the sense of perspective. Instead of capturing the scenery in front of you in a two-dimensional way, try taking pictures with an awareness of three-dimensionality, perspective, and overlapping scenery.
Capture vast landscapes with a wide-angle lens

For landscape photography, we recommend using a wide-angle lens. Wide-angle lenses have a wide angle of view, allowing you to capture a spectacular landscape in one shot.
Wide-angle lenses also have the characteristic of emphasizing perspective. By taking advantage of this characteristic, you can capture subjects in the foreground larger and landscapes in the distance smaller, creating a photo with more depth. When photographing expansive landscapes such as mountains or coastlines, we recommend using a wide-angle lens.
Emphasise dynamism through composition

Composition is essential to taking impressive landscape photos. First, you should be aware of horizontal and vertical lines such as the horizon and buildings. Using the camera's spirit level to maintain horizontality will result in a well-balanced photo. Effectively positioning the main subject will also help to clarify the points you want to highlight. Try using the composition techniques explained below.
Rule of thirds

One of the most basic compositions in landscape photography is the rule of thirds. This composition technique divides the screen into thirds vertically and horizontally and places the main subject at the intersection. For example, when photographing the sea or a lake, aligning the horizon with the top or bottom third of the field will create a stable composition. Also, placing a key subject or shape at the intersection will help to naturally guide the viewer's gaze.
Four-quarter composition

A more detailed way to compose a shot is to use the quadrant composition. This is a technique in which the screen is divided into four equal parts vertically and horizontally, and the subject is positioned using this grid.
This is effective for arranging complex subjects in a well-balanced way, and is also used for photographing cityscapes and architecture. In landscapes with many buildings and linear elements, keeping this grid in mind will make it easier to organize the information.
Two-part composition

A simple yet effective composition is the split composition. This is a technique that divides the screen into two halves, top and bottom, and is particularly effective in photos that make use of the horizon. Typical examples include photos of symmetrical subjects or reflections of the sky and water. Although the composition is simple, it can give the photo a powerful impression.
Diagonal composition

If you want to add depth and dynamism to your photos, we recommend a diagonal composition. Placing the main subject on the diagonal of the screen will create movement throughout the photo. Natural landscapes, in particular, often contain diagonal lines, such as roads, rivers, and mountain ridges. Using these natural lines as diagonals will make your photos more impressive.
Triangular composition

If you want to achieve both stability and dynamism, try using a triangular composition. This composition can give your photo a sense of calm and strength. Look closely at your subject and if there is a terrain or shape that can be captured in a triangle, try incorporating it into a triangular composition. You can also combine multiple subjects, such as trees, rocks, and buildings, to create the sides of a triangle.
Exposure setting tips
Proper exposure settings are necessary to make a landscape look beautiful. Underexposure will result in a dark photo, while overexposure will make it difficult to capture delicate details. Here are some guidelines for exposure settings.
Use aperture priority mode
In landscape photography, the key is to ensure that the entire image is sharp, so the F-stop (aperture value) is important. For this reason, we recommend using the aperture priority mode. In this mode, the photographer sets the F-stop, and the shutter speed is automatically set to ensure proper exposure. This makes it easier to capture the fine details of the landscape clearly.
Set the F-number (aperture) slightly smaller
To clearly depict the details of the landscape from the foreground to the background, it is a good idea to narrow the aperture to around F8 to F11. However, if there is insufficient light, such as in the morning or evening, the photo may appear dark. Adjust the F-number to a smaller value while checking the final result.
Don't make the shutter speed too slow
Regarding the shutter speed, taking into consideration that vegetation will sway in the wind, it is a good idea to set it to around 1/100th of a second. There is no problem if it is slower than this, but if you are shooting handheld, a slow shutter speed can easily cause camera shake, so be careful not to set it too slow. However, if there is insufficient light, such as at dusk, use a tripod and set a slower shutter speed.
Increase the ISO sensitivity when it is dark
When setting a fast shutter speed in a situation where there is insufficient light, increase the ISO sensitivity. Start by aiming for around ISO 400 to 800, and adjust while looking at the image. However, if you increase the ISO sensitivity more than necessary, noise may cause a decrease in image quality, so it is easier to obtain a clear image if you keep the ISO sensitivity as low as possible.
Set the exposure to a positive value when the gap of difference in brightness is big

Exposure compensation is effective when shooting scenes with a large difference in light and dark, such as backlit scenes or at dusk. For example, in a scene where the sky is bright and the ground is dark, the ground may appear dark. In such cases, adding positive compensation will allow the ground to be properly depicted in fine detail. However, be careful not to use too high a compensation value, which can result in overexposure.
Be aware of changes in natural light depending on the time of day

When taking landscape photos, you should also consider the impression of sunlight. The golden hour in the morning and evening produces soft light that gives the landscape a warmth. You can also use long shadows to emphasize the three-dimensional effect. On the other hand, strong sunlight in the daytime tends to result in short shadows and a large difference in light and dark. For this reason, it is easier to take properly exposed photos on slightly cloudy days or in the shade than on a clear, sunny day.
Adjust the atmosphere with white balance

White balance settings can be used not only to adjust color tones, but also for creative expression. We generally recommend shooting with auto white balance, but by changing the settings depending on the scene, you can bring out more natural or intentional colors.
Generally, you can obtain natural colors suited to each weather condition by selecting the "Sunny" mode when it's sunny and the "Cloudy" mode when it's cloudy. If you have a favorite color, try changing the white balance and observing the difference in blueness or redness.
Tips for shooting according to the scene
There are many different types of landscape photography, and each has its own appropriate shooting method. From here on, we will introduce some typical landscape scenes and provide specific tips.
Mountain ranges and high-altitude views

When shooting from a high place, be mindful of the timing of your shot. In the early morning when the weather is nice and the air is clear, you can capture the distant mountains clearly. Depending on the weather, a sea of clouds or fog may also occur, and by incorporating these natural phenomena, you can take photos with a fantastic atmosphere.
To capture the expanse of the mountains in an impressive way, we recommend using a wide-angle or ultra-wide-angle lens. Try to create a composition with depth by placing subjects such as rocks or trees in the foreground. You can also create a more dynamic impression by placing the mountain ridge along the diagonal of the screen.
Sea and lake

When taking photos of seascapes, lakes, etc., consider the placement of the horizon. A tilted horizon will make the photo look less stable, so try to make it straight. Using a spirit level will make it easier to maintain accurate horizontality.
Also, to capture the beauty of the water's surface, it's important to keep the shutter speed in mind. If you want to softly express the rippling of the waves and water surface, try a slightly slower shutter speed of around 1/30 second.
Fields and grasslands

To bring out the charm of grasslands, it is effective to devise a shooting position. Shooting from a high viewpoint can emphasize the breadth and depth of the grassland. For example, shooting from a high vantage point can impressively express the expanse of the grassland that continues from the foreground to the background.
Also, to create a sense of the season, try incorporating trees, flowers, and leaves in the foreground into the composition. By incorporating elements that symbolize the season, such as fresh greenery and flowers in spring, or red leaves in autumn, you can create a photo with a richer range of expressions.
Night view

When photographing night scenes, it is essential to use a slow shutter speed to compensate for the lack of light. For this reason, it is essential to use a tripod to prevent camera shake. The shutter speed varies depending on the brightness of the subject, but it is common to shoot with a long exposure of several to several tens of seconds.
Since it is a dark scene, you may want to increase the ISO sensitivity, but if you increase it too much, noise will become noticeable and the sharpness of the light may be lost, so adjust it while watching the situation. If necessary, you can use a remote shutter or self-timer to take more stable photos.
Buildings and streets

When photographing cityscapes, it is important to be aware of the camera's orientation and the horizontal and vertical directions so that the vertical lines of the buildings are not tilted. Look for a composition that conveys a sense of depth and depth.
Using a wide-angle lens in this scene will emphasize the perspective, allowing you to capture the breadth and depth of the city in an impressive way. Also, incorporating elements unique to cities, such as the shadows of buildings and the reflection of light on window glass, will make the landscape even more appealing.
How to choose the right lens for landscape photography
To bring out the best in your landscape photography, it's important to choose the right lens to suit your shooting style and purpose. Here we'll introduce some points to consider when choosing a lens suitable for landscape photography.
A wide-angle lens is recommended for starters
Wide-angle lenses have a wide angle of view, so you can capture the entire landscape in one shot. When shooting landscapes, start with a wide-angle lens or a zoom lens with a focal length on the wide-angle side. For more serious photography or creative endeavors, consider using an ultra-wide-angle lens.
Lightweight and compact lens makes it easy to carry around

Landscape photography can involve long journeys to the shooting point and walking along mountain paths. For this reason, we recommend choosing a lens that is as lightweight as possible. In addition, compact lenses are less bulky and more mobile, allowing you to enjoy greater freedom in your photography.
Check the maximum aperture
When choosing a lens, the maximum aperture is also one of the things to check. Lenses with a small maximum aperture have the advantage of being able to capture sufficient light even in dark scenes. Generally, a lens with a brightness of around F2.8 to F4 is sufficient for a variety of landscape photography.
Autofocus (AF) performance
By choosing a lens that allows for smooth AF and accurate focusing, you can reduce the stress of shooting. If you choose a lens that can focus smoothly even in dark places and has high motion tracking capabilities, you can apply it to more than just landscape photography.
Check the Vibration Compensation mechanism
You should also check whether the lens has a Vibration Compensation mechanism. If the lens has an image stabilization function, you can take stable shots even with handheld shooting at a relatively slow shutter speed. Image stabilization is particularly effective when shooting at telephoto settings or in low-light conditions.
Take advantage of the wide-angle effect to capture dynamic landscapes
Landscape photography is a complex field that not only captures the beauty of nature, but also expresses the emotions and atmosphere that exist there. In addition to being aware of photography tips, you can take good photos by visiting the location and taking your time to face the scenery. Try taking lots of pictures while observing the changes in light and landscape expressions depending on the season and time of day.

Lens Featured in this Impression
-
-
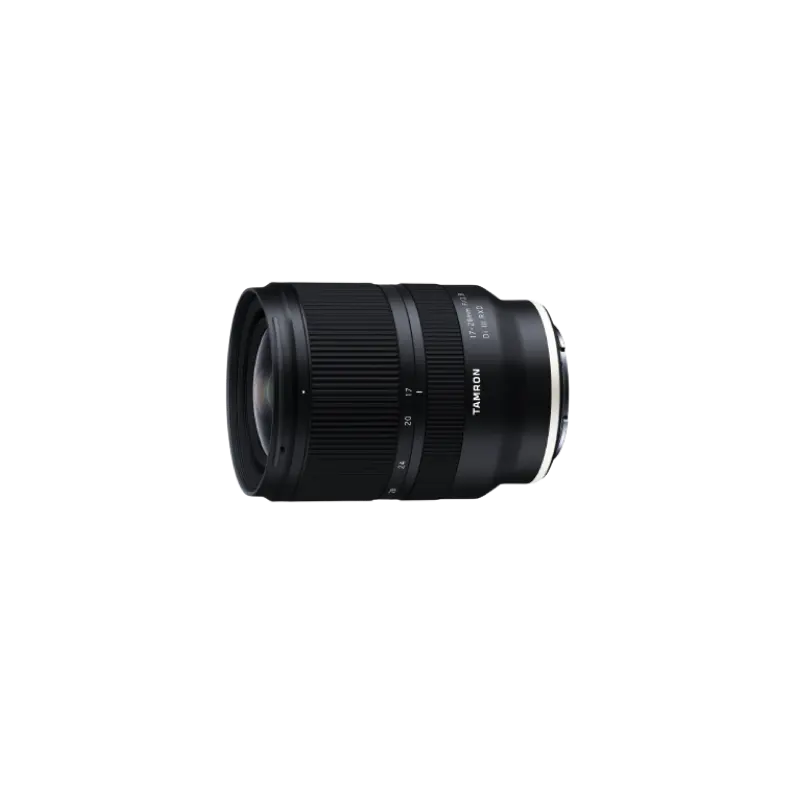
17-28mm F/2.8 Di III RXD a046(Model )
The 17-28mm F/2.8 Di III RXD (Model A046) achieves a filter diameter of ø67mm, which is surprising for a large aperture ultra wide-angle zoom lens for full-frame cameras. It’s small and light weight with a good camera balance. It's a dedicated lens for mirrorless interchangeable -lens cameras that can be carried easily and can be used in various situations.
-
-
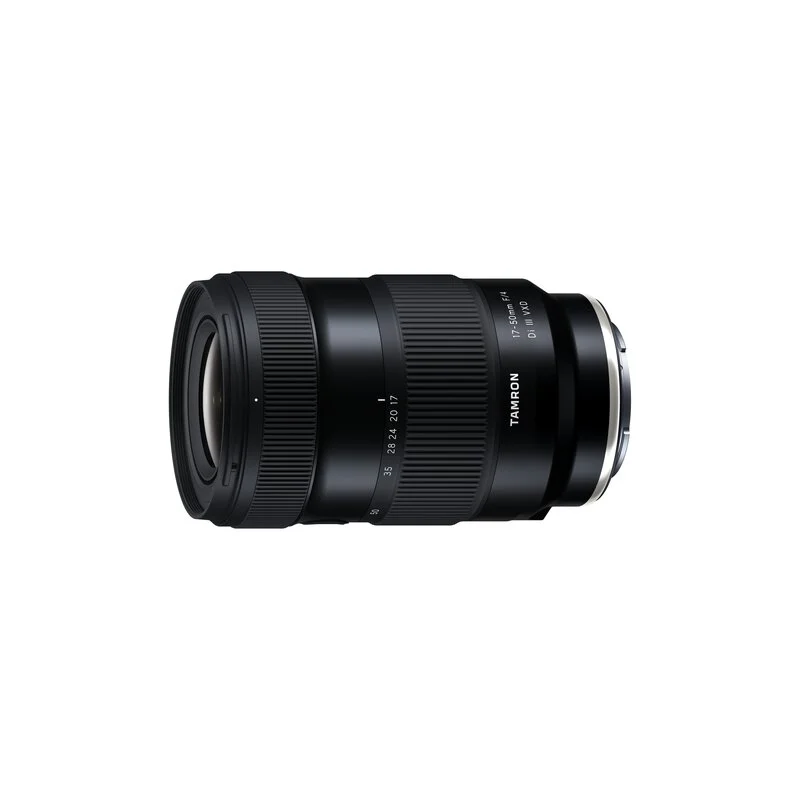
17-50mm F/4 Di III VXD a068(Model )
It's the world’s first lens covering from ultra wide-angle 17mm to the standard 50mm focal length. The highly-compact TAMRON 17-50mm F/4 Di III VXD (Model A068) for Sony E-mount full-frame mirrorless cameras offers maximum versatility for still and video creators. From landscapes to living rooms, this lens captures all that you see.
-

-
11-20mm F/2.8 Di III-A RXD b060(Model )
Product Page | 11-20mm F/2.8 Di III-A RXD (Model B060) is the world's first compact, lightweight F2.8 ultra wide-angle zoom lens for Sony E-mount APS-C mirrorless cameras. Can be a great choice for video shooting.
-

-
20mm F/2.8 Di III OSD M1:2 f050(Model )
The 20mm F/2.8 Di III OSD M1:2 (Model F050) is a 20mm fixed focal lens featuring F/2.8 and high close-up shooting, allowing you to enjoy ultra wide-angle photography in earnest. With a MOD (Minimum Object Distance) of 0.11m, you can enjoy the world of ultra wide-angle photography that you have never experienced before.
-
-
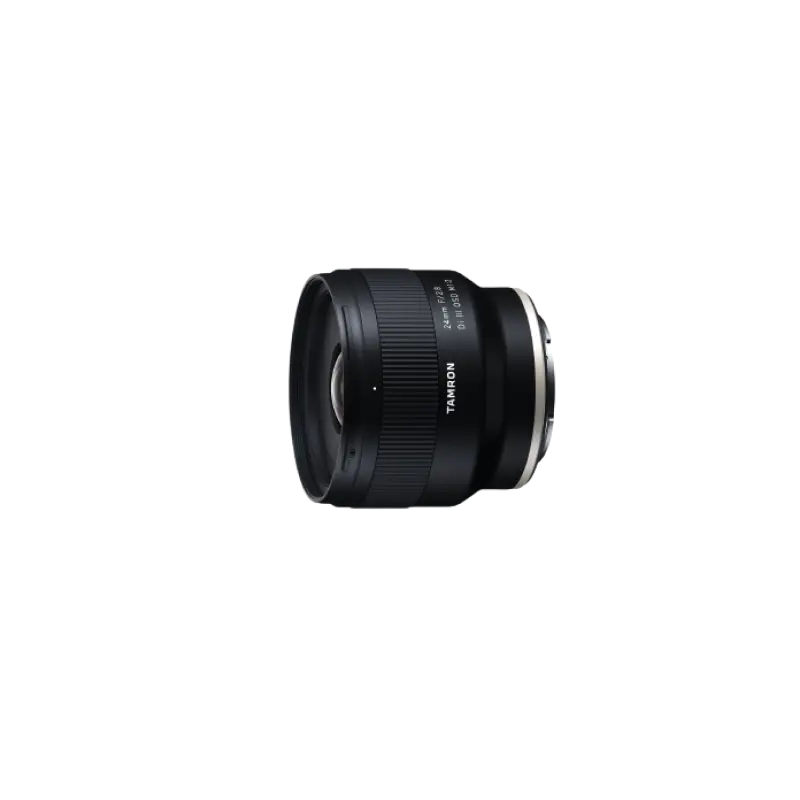
24mm F/2.8 Di III OSD M1:2 f051(Model )
The 24mm F/2.8 Di III OSD M1:2 is a wide-angle fixed focal lens that allows you to get incredibly close-up. Its focal length is 24mm and the MOD (Minimum Object Distance) is 0.12m. The compact and lightweight design that allows you can shoot light, making it ideal for snapshots.